Docker on Windows 10 provides a lightweight virtualization option for development and is a great option for supporting multiple development environments on Windows 10. SQL Server on Docker installs quickly, starts up fast and is quite flexible. Multiple containers can be running at the same time using the same image but contain different data. When you are done developing for the day simply shut down the container or remove it. It’s a great option for, let’s say, studying for a Microsoft certification, developing an app or just testing some queries. For someone like myself, who tries to keep the laptop clean, it’s a great tool. Prior to Docker on Win 10, I would usually create a virtual machine for each client or application I work on to avoid junking up my laptop.
Docker (Very) Basics
If you don’t know Docker well that’s alright. The goal of this post is to get SQL Server up and running using a Docker container. We will persist the data outside the container in a Docker volume so we can delete the container keep the data for later use. We do not need a deep dive into Docker, just a handful of repeatable Docker commands. Developers and data analysist do not need to become Docker engineers to get the benefit of Docker.
Running SQL Server in a Docker container is not very difficult. What I found challenging was externalizing the data so I would not lose my data if I removed the container. Docker containers are the running instance of a Docker image. The SQL Server docker image contains the required binaries and file system needed to start up and run SQL in a container. By default, all data in the SQL Server docker container is stored in the Docker container. Delete the container, on purpose or accidently results in deleting the database files. Why would you remove a container? Possibly you need to clean up a hard drive for space reasons. If we can store the SQL Server data external to the container we can always create a new container and use the existing data.
Docker volumes will solve this issue. With a Docker volume a container can write to a host file system and persist data in a volume outside the Docker container. Delete the container and the volume lives on. Recreate the container and mount the volume and all of a sudden your files are available. What is nice about SQL Server when you recreate the image and mount the volume the databases are available. If you never delete the container, ever, you can just stick with the container storage.
There is a lot of information about Docker and SQL Server but little step by step information on how to persist your data files to a Docker volume. This post should provide a step-by-step demonstration on how to persist SQL Server data in a Docker volume starting from the image, stopping and starting the container and finally deleting and recreating the container while keeping your data. This post assumes you have already install Docker Desktop on a Windows 10 machine. If you need help with installing Docker on Win10 use this link: https://docs.docker.com/docker-for-windows/install/.
Docker Run to Create the Container
First step is to retrieve the SQL Server Docker image from Docker Hub followed by creating a docker container from the image. Docker’s Run command will retrieve the image if it does not exist locally and then create and start the Docker container. The run command will accept arguments defining a Docker volume and the container mount point, port mappings and a few environment variables for SQL Server.
I use Windows Terminal ( available from the Windows store) to manage Docker. With this one single command you can be up and running a SQL Server 2019 container with persisted data.
docker run --name <optional container name> -e'ACCEPT_EULA=Y' -e 'MSSQL_SA_PASSWORD=<strong password>' -p <host port>:<container port> -v <volume name>:<container mount point> -d <image>Here are the arguments explained:
—name: Provide a easy to use name. For example sql2019.
–e ‘ACCEPT_EULA’ : environment variable accepting the SQL Server EULA
–e ‘MSSQL_SA_PASSWORD’: environment variable defining the SA password. Note: if does not pass the complexity requirements the container will start and immediately stop.
-p: Port mappings. What comes in on the host port is passed to the container on the container port.
-v: This is what creates the local volume and maps it to a mount point in the container. If volume does not exist, Docker will create the volume.
-d: Run the container detached or in the background.
<image>: The image name to pull from Docker Hub or local to use in the container.
The command below will start a Docker container using the SQL Server 2019 image and persist the data in a volume named sqldatavol. Notice the host is passing port 1443 to the container as 1433.
docker run --name sql2019 -e'ACCEPT_EULA=Y' -e 'MSSQL_SA_PASSWORD=P@ssword1' -p 1433:1433 -v sqldatavol:/var/opt/mssql -d mcr.microsoft.com/mssql/server:2019-latest
The run command will download, create and start the container and return the container id. I have already downloaded the mcr.microsoft.com/mssql/server:2019-latest docker image before this run. If this is the first time using the image, or the image has been updated, you will see the download information in the terminal.
Verify Docker Container and Volume
You can verify the container is up and running using the Docker command line:
docker container ls -a 
The -a argument will show all containers, including containers that are not currently running
You can also verify the sqldatavol has been created with:
Docker volume ls
As you can see, I have multiple Docker volumes created. We are interested in sqldatavol for this post. If you are really interested you can inspect the sqldatavol with this command:
docker volume inspect sqldatavol
Your container should be up and running with SQL Server 2019 by now. Open up SQL Server Management Studio or Azure Data Studio and connect. Connect to the localhost or 127.0.0.1 using the SA user and the SA password provided in the run command. Once SQL Server 2019 is up and running you should be able to connect work with the container like any other SQL Instance. Just a note: the container is running the Linux version of SQL Server which might have a few less features that the Windows version.
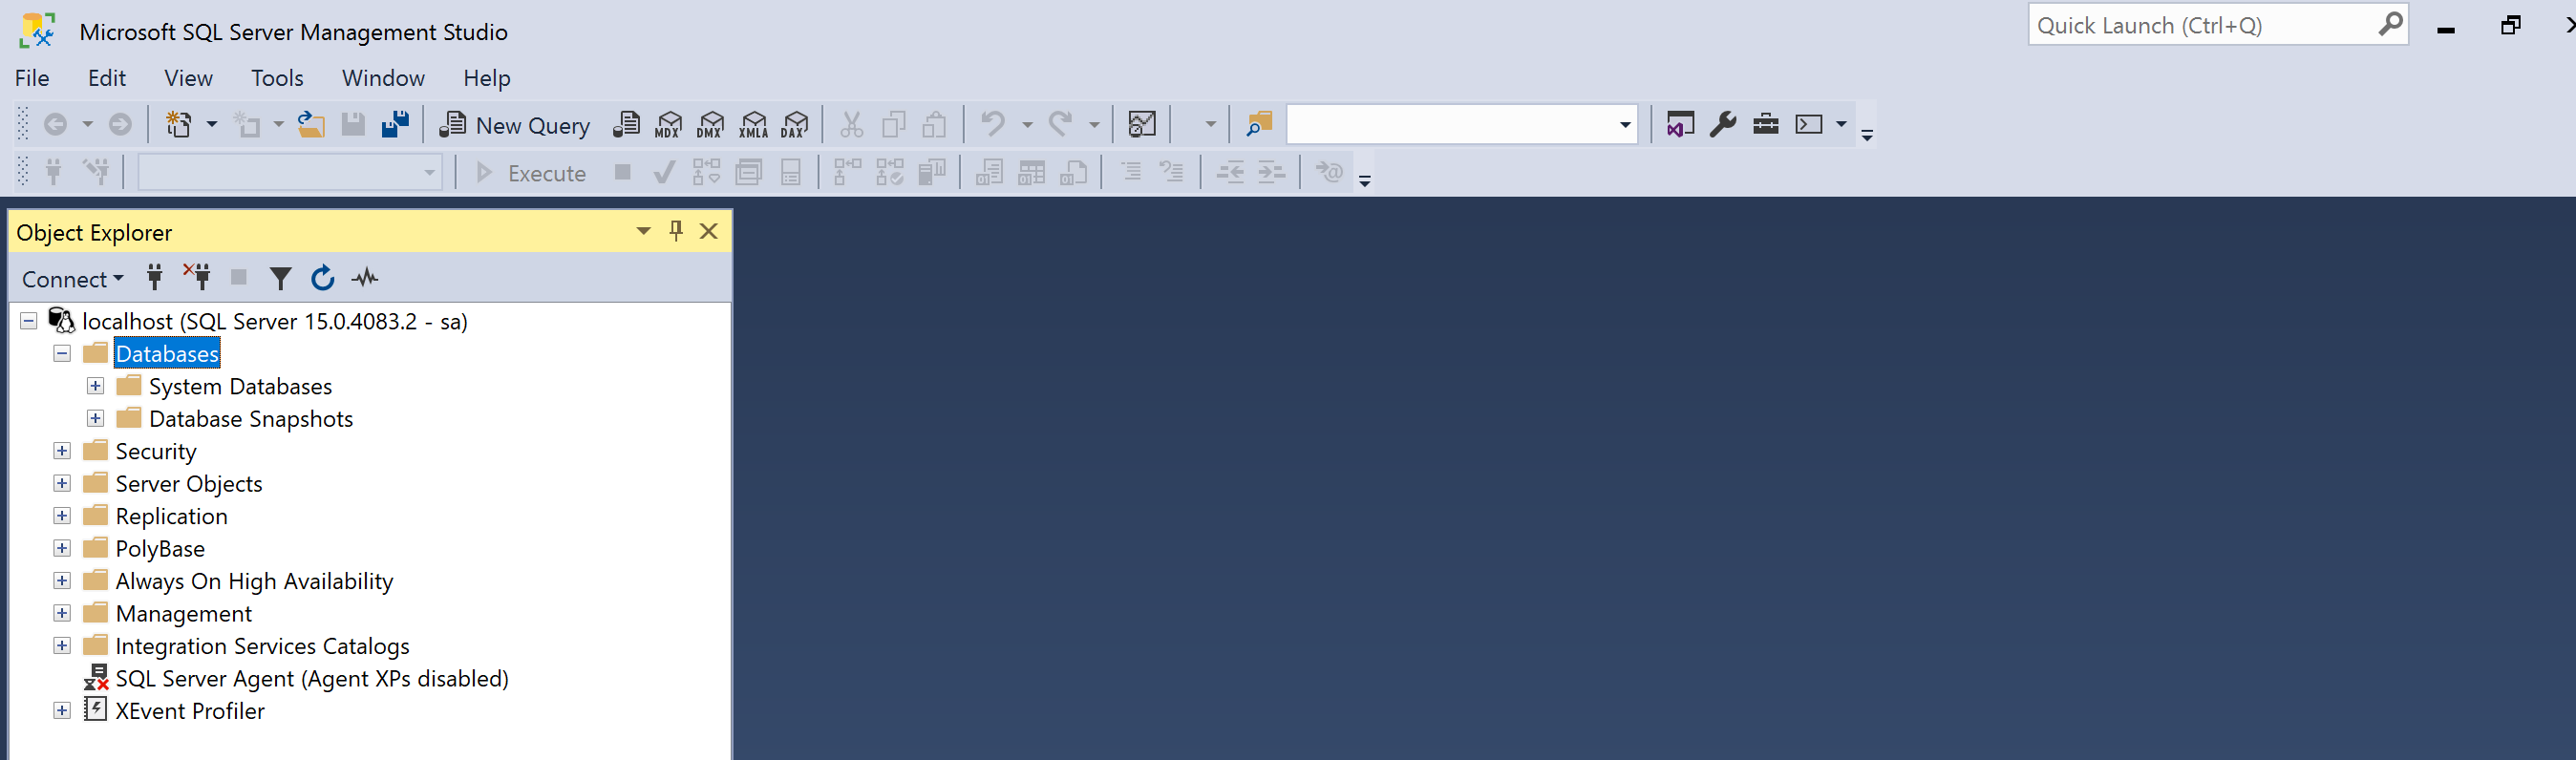
Restore A SQL Server Backup File
You can easily use SSMS or Azure Data Studio to create and work with a database. I am going to use my SQL 2019 container to work on some of the more tricky statement such as SQL windowing functions and Cross Apply. I am going to set up Microsoft’s sample database Adventure Works on this instance running in Docker.
The Adventure Works 2019.bak file is currently located at: https://github.com/microsoft/sql-server-samples/releases/tag/adventureworks
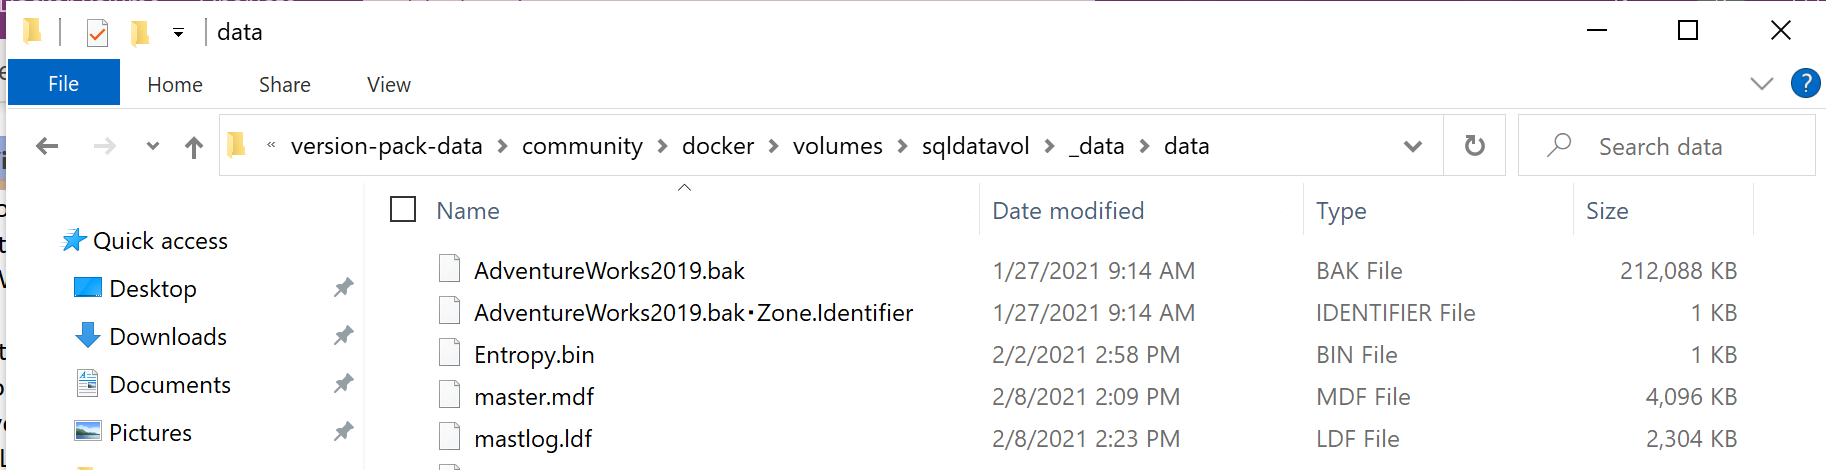
After you download this to your host we will need to copy the .BAK file to the sqldatavol created in the run command. This is the part I always forget, where did Docker put my volume? Docker is using the Windows Subsystem for Linux or WSL2 (version 2). The secret sauce to get to your WSL file system, specifically where Docker is storing volumes is:
\wsl$\docker-desktop-data\version-pack-data\community\docker\volumes. Open the sqldatavol folder and place the .BAK file into _data\data. The full path for my Win10 computer and the sqldatavol is:
\wsl$\docker-desktop-data\version-pack-data\community\docker\volumes\sqldatavol_data\data
Now all we need to do is a normal SQL Server restore database using the .BAK file and we should have a brand new sample database available.
To restore the Adventure Works database, in SSMS right click on Database, then click Restore Database to open the Restore Database dialog. Select the device option button and then the button with the ellipse to open the Select Backup Device dialog. Click the Add button and you should be able to select the AdventureWorks2019.bak file.
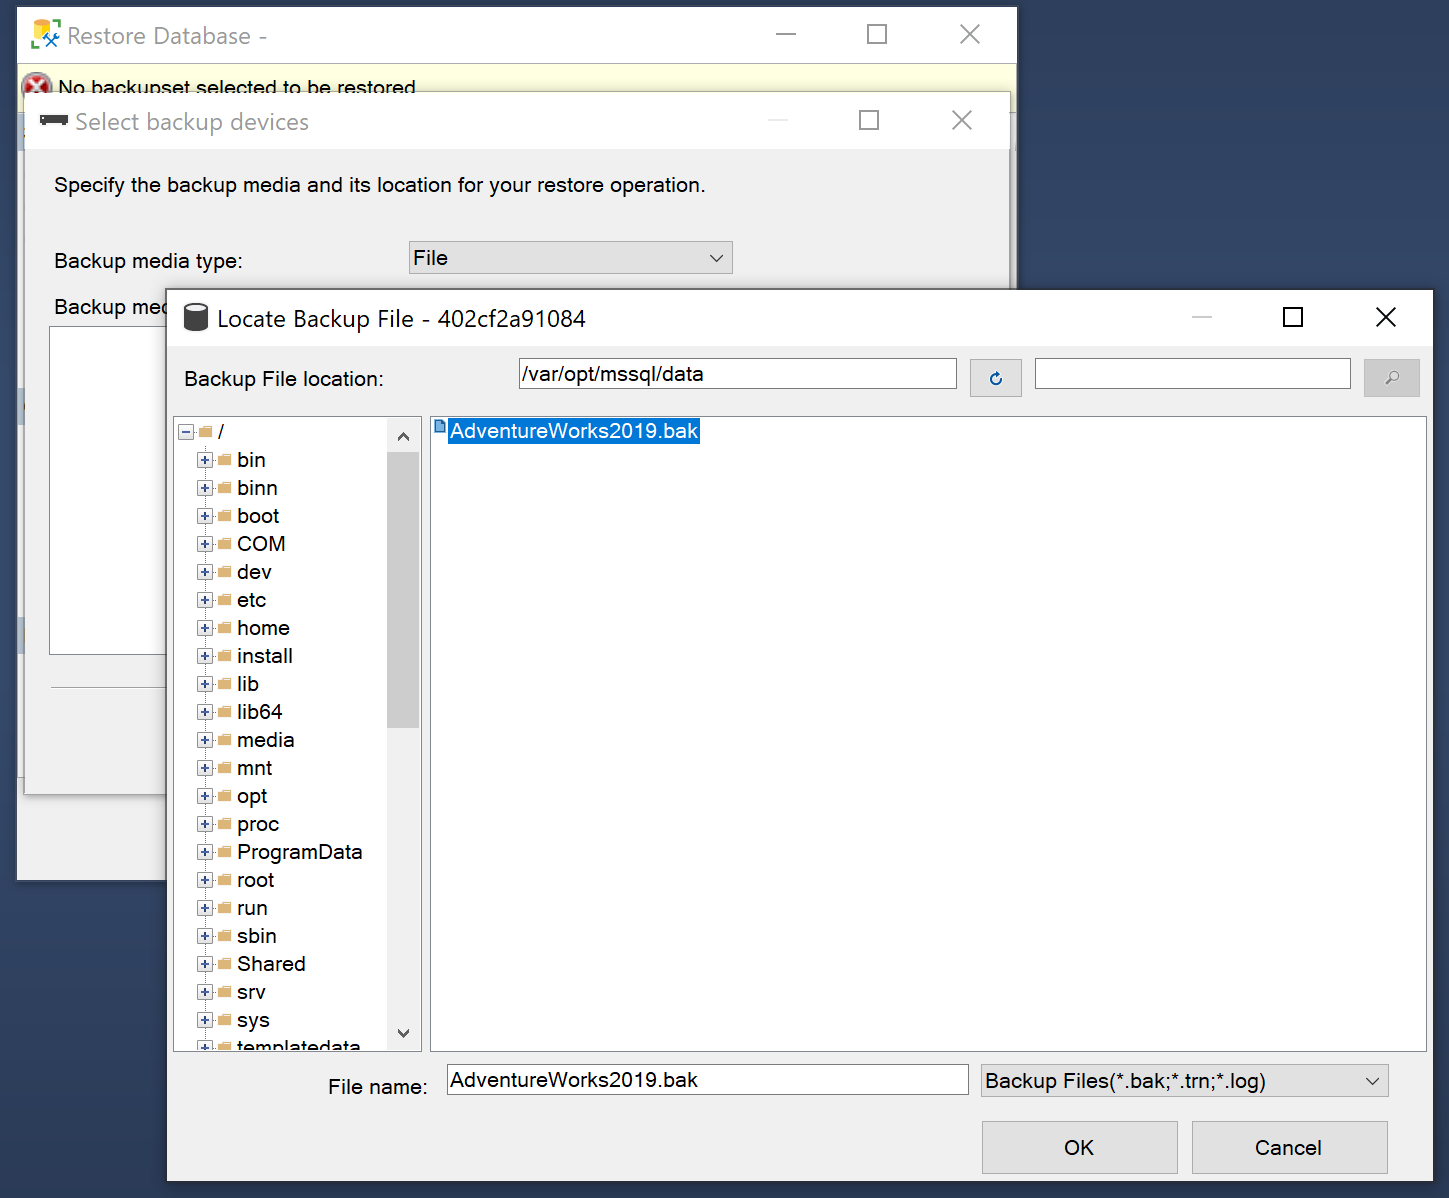
A few clicks of the various OK button should result in a shiny new AdventureWorks2019 database
Go ahead, make a few queries against the restored Adventure Works 2019 database.

That seems like a lot of steps but in reality it’s fewer steps and much quicker than installing SQL Server on a Windows machine. There are two added benefits with running SQL in Docker for a dev or training scenario:
1. The container can be stopped when not needed, releasing any resources used by SQL Server
2. My laptop environment is much cleaner. I can delete the container and leave no trace of SQL Server, with exception of the volume that persists the data.
Shutdown the SQL Server Container
Now that we have a database in the SQL Server docker container. That’s enough work for one day, right? We can shut down the container with the following command:
docker container stop sql2019
Stopping a container is similar to stopping a virtual machine. Everything remains in place until you want to restart the container.
To verify the container has stopped list the Docker containers using the -a argument which will show both running and stopped containers:
docker container ls -a
You can also try to query the database in SSMS or Azure Data Studio. It should fail miserably because there is no longer a SQL Server database instance available.
Start the Existing SQL Server Container
Because the container was only stopped we can easily start it again.
docker container start sql2019
Adventure Works 2019 is still available in the SQL Server 2019 instance. So far, we have not really had a need to store the data in a Docker volume. If we did not use a volume, the data would be saved internally in the container. The container can start and stop without losing the data. That is not true when the container is removed.
Remove the SQL Server Docker Container
There are times when you want to remove the container and that means that any data stored in the container is removed as well. Since we put the data in a docker volume, the volume remains even if we delete the Docker container. We can only remove a stopped container. So if your container is still running you will need to stop the container using the following command:
docker container stop sql2019Now with container stopped, remove the Docker container using the following command:
docker container rm sql2019
Next, verify the container is no longer available using the following command:
docker container ls -a.Again, any attempt to query the data in SQL Server Management Studio or Azure Data Studio should fail because there is no database available. Even though we removed the container for good, the volume with our data is still available. Verify the sqlvolume exists:
docker volume ls
Create a New SQL Server Docker Container
Finally, create a new container just to prove our data is still available in the volume. In this example we can create a new container using a different container name (sql2019a):
docker run --name sql2019A -e'ACCEPT_EULA=Y' -e 'MSSQL_SA_PASSWORD=P@ssword1' -p 1433:1433 -v sqldatavol:/var/opt/mssql -d mcr.microsoft.com/mssql/server:2019-latest
With the new container created, we can verify it has started. Notice the name of the container is sql2019A. It will also have a different container id.
Let your SQL Server instance start up and you should be able to connect to the instance using SSMS or Azure Data Studio and query the Adventure Works 2019 database. No need to restore backup files or attach files.

Final Thoughts
It might seem like a lot of steps but it actually is really easy to accomplish. With Docker, I cant turn on and off my SQL Server instance. With Docker volumes I can delete my container and create a new container whenever I need it while keeping the data intact. Compare this to setting a virtual machine, installing a operating system and then SQL Server. This is so much faster and simpler thanks to Docker.
